스마트폰에서 접속하면 다음과 같이 제어 할 수 있습니다.

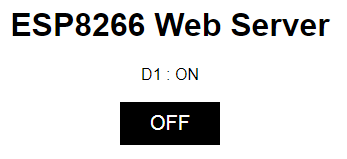
nodeMCU D1(G{IO5)에 LED를 연결하여 스마트 폰에서 제어(On, Off) 합니다.

● D1~D12와 GPIO 관계입니다.
|
Nodemcu |
ESP8266 |
Nodemcu |
ESP8266 |
|
D0 |
GPIO16 |
D7 |
GPIO13 |
|
D1 |
GPIO5 |
D8 |
GPIO15 |
|
D2 |
GPIO4 |
D9 |
GPIO3 |
|
D3 |
GPIO0 |
D10 |
GPIO1 |
|
D4 |
GPIO2 |
D11 |
GPIO9 |
|
D5 |
GPIO14 |
D12 |
GPIO10 |
|
D6 |
GPIO12 |
회로 구성
준비물 : nodeMCU, 저항 330옴, LED, 점프선

A : LED 내부 작은 조각은 +입니다.
B : 저항 330옴 무극성으로 -라인에 연결합니다.
C : LED+라인과 D1핀을 연결합니다.
D : GND(-)을 -줄에 연결합니다.
#include <ESP8266WiFi.h>
const char* ssid = "IOT22";
const char* password = "zzz19540410";
WiFiServer server(80);
String header;
String D1State = "OFF";
unsigned long currentTime = millis();
unsigned long previousTime = 0;
const long timeoutTime = 2000;
void setup() {
Serial.begin(115200);
pinMode(5, OUTPUT);
digitalWrite(5, LOW);
Serial.print("Connecting to ");
Serial.println(ssid);
WiFi.begin(ssid, password);
while (WiFi.status() != WL_CONNECTED) {
delay(500);
Serial.print(".");
}
Serial.println("");
Serial.println("WiFi connected.");
Serial.println("IP address: ");
Serial.println(WiFi.localIP());
server.begin();
}
void loop() {
WiFiClient client = server.available();
if (client) {
Serial.println("New Client.");
String currentLine = "";
currentTime = millis();
previousTime = currentTime;
while (client.connected() && currentTime - previousTime <= timeoutTime) {
currentTime = millis();
if (client.available()) {
char c = client.read();
Serial.write(c);
header += c;
if (c == '\n') {
if (currentLine.length() == 0) {
client.println("HTTP/1.1 200 OK");
client.println("Content-type:text/html");
client.println("Connection: close");
client.println();
if (header.indexOf("GET /5/ON") >= 0) {
D1State = "ON";
digitalWrite(5, HIGH);
} else if (header.indexOf("GET /5/OFF") >= 0) {
D1State = "OFF";
digitalWrite(5, LOW);
}
client.println("<!DOCTYPE html><html>");
client.println("<head><meta name=\"viewport\" content=\"width=device-width, initial-scale=1\">");
client.println("<link rel=\"icon\" href=\"data:,\">");
client.println("<style>html { font-family: Helvetica; display: inline-block; margin: 0px auto; text-align: center;}");
client.println(".button { background-color: #FF1064; border: none; color: white; padding: 10px 30px;");
client.println("text-decoration: none; font-size: 20px; margin: 2px; cursor: pointer;}");
client.println(".button2 {background-color: #000000;}</style></head>");
client.println("<body><h1>ESP8266 Web Server</h1>");
client.println("<p>D1 : " + D1State + "</p>");
if (D1State == "OFF") {
client.println("<p><a href=\"/5/ON\"><button class=\"button\">ON</button></a></p>");
} else {
client.println("<p><a href=\"/5/OFF\"><button class=\"button button2\">OFF</button></a></p>");
}
client.println("</body></html>");
client.println();
break;
} else {
currentLine = "";
}
} else if (c != '\r') {
currentLine += c;
}
}
}
header = "";
client.stop();
Serial.println("Client disconnected.");
Serial.println("");
}
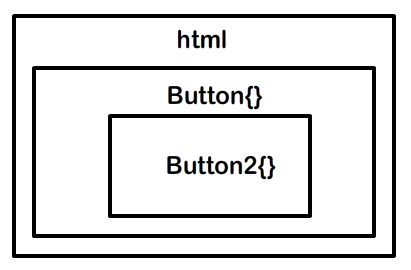
}HTML 기본 구조에서 <head></head>부분에 번튼 속성을 설정합니다.
<html>
<head></head>
<body>
<h1>ESP8266 Web</h1>
</body>
</html>
속성 코드에서 서버에서 클라이언트로 보내는 명령 client.println을 삭제합니다.
<head><meta name=\"viewport\" content=\"width=device-width, initial-scale=1\">");
<link rel=\"icon\" href=\"data:,\">
<style>html { font-family: Helvetica; display: inline-block; margin: 0px auto; text-align: center;}
.button { background-color: #FF1064; border: none; color: white; padding: 10px 30px;
text-decoration: none; font-size: 20px; margin: 2px; cursor: pointer;}
.button2 {background-color: #000000;}</style>
</head>
복잡한 스타일 코드는 집합 개념입니다.
{ }를 기본으로 나누어 봅니다.
<style>html { font-family: Helvetica; display: inline-block; margin: 0px auto; text-align: center;}
.button { background-color: #FF1064; border: none; color: white; padding: 10px 30px;
text-decoration: none; font-size: 20px; margin: 2px; cursor: pointer;}
.button2 {background-color: #000000;}</style>
html { } .button { } .button2 {}
'코딩 놀이' 카테고리의 다른 글
| HTML 버튼 (0) | 2021.03.08 |
|---|---|
| HTML 2 LED 제어 (0) | 2021.03.08 |
| HTML 언어 구조 (0) | 2021.03.07 |
| 서버와 스마트폰 (0) | 2021.03.07 |
| WiFi 공유기 접속 (0) | 2021.03.07 |


